

Some of you may have already seen the trailer...
The first in the series is a classic Gundam mobile suit:
RX-77-2 Guncannon
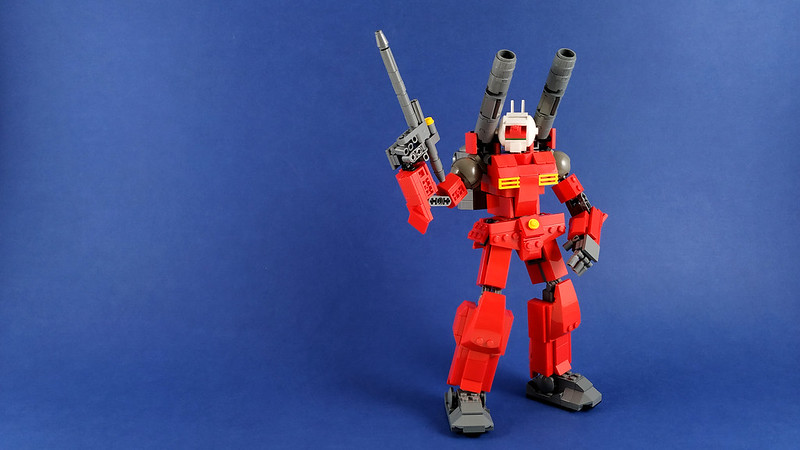
(the picture is a link to a short video with 360° views of various poses)
See you next Monday!
Some of you may have already seen the trailer...
The first in the series is a classic Gundam mobile suit:
RX-77-2 Guncannon
(the picture is a link to a short video with 360° views of various poses)
See you next Monday!
As mentioned on Flickr: Looking forward, curious what you've prepared for upcoming Mondays.
Mech-wise i'm always struggling to connect arms and legs in a proper (poseable) way. Using those "Ball/Joint"-Combos as shoulders seems like a very good solution!
Thanks, Marcel.
The turret balls are actually a bad solution for any joint that carries the weight of more than a few smaller bricks. The friction is very low so it is hard to pose them or get them to stay where you want and not where gravity wants to pull them, especially if you want to film rotation on a turntable; the vibrations don't help one bit! The angles aren't all that great either, so you don't get as much as you would with a standard ball joint. For this model I had to attach each shoulder ball to another joint (Technic pins) in order to work around this problem. Attaching the ball to another (proper) ball joint would be even better but there was no room because of the cannons. Even with all that, I simply had to use them in this model because they were the perfect solution to replicate the looks of the RX-77-2's shoulders. They are what I based my model around and they determined the scale; however, if looks are not what you are going for, I wouldn't recommend them.
P.S.
I tried cheating with inserting a rubber band in the socket, but because the balls are split in two parts, there was not enough room to squeeze the second half in. I guess using stickers on the passive half of the ball (the one that sits idly in the socket) could work, but I don't have any stickers to spare for the purpose and I'm not sure how many layers it would take for the desired effect.
![]() Ahhhh. 51 to go.
Ahhhh. 51 to go. ![]()
I love to see one of your MOCs here, Marin. And I am of course looking forward for the next 51 weeks... what a project.
As Marcel already said, the ball-joint-combo is a great idea. Also enjoyed the video - great poses.
Only 5 days to go wait ![]()
Ben
Thanks, Ben!
Btw, Marcel, I've just discovered an elegant solution to the friction problem. You know the 2x3 light bricks that have their own batteries? They come with those small pieces of plastic you need to pull out in order for the lights to work. Well, I used those, one per socket, and it works like a charm. It doesn't seem like stressing the bricks yet the friction is significantly improved.
Haha ![]() Sounds purist to me, might come in handy in a few other situations with friction problems.
Sounds purist to me, might come in handy in a few other situations with friction problems.
I like how you used backlighting to get a black silhouette of the next model.
I must not be purist enough, I thought double sided tape and Blu tack were just photography tools, especially if have to do animation.
Continuing with another Gundam mobile suit:
STH-16 Shiden
(the picture is a link to a short video with 360° views of various poses)
See you next Monday!
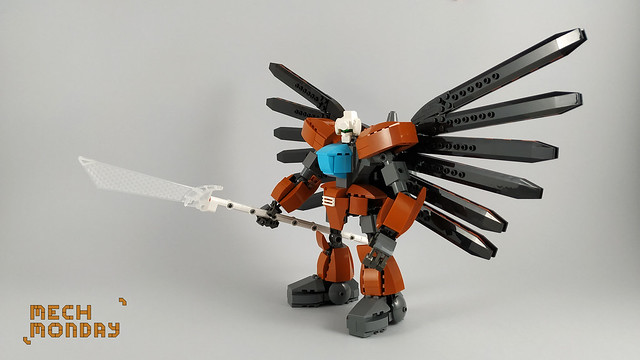
Taking a break from Gundam with this robot, a cute little wind-up toy. What it lacks in articulation it makes up for in character.
This model is dedicated to the guys at Build Better Bricks. If don't know them, go check them out because they rock.
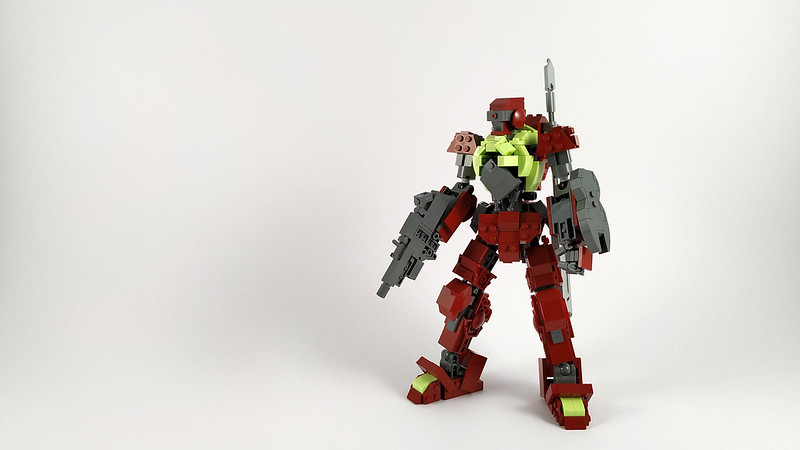
Roboknight
(the picture is a link to a short video with 360° views of various poses)
Join in on the fun and see what other people have built so far in the Flickr group.
See you next Monday!
So, it's Commenting Tuesday for me now, i guess.
Great to see you guys building week by week....but the race has just began. Good to see you experimenting, love the use of technic bricks to achieve his visor. Beside that the lime green part is well executed, no clue how the "feather-part" is properly called.
I would recommend to maybe reuse those fingers in future mechs, looks like a great, sleek solution!
Hi Marin,
I love your new mech. It reminds me a little bit on a character from League of Legends, if i see the proportions of your mech. I also like the technic of the hands and that they can hold thw sword and the shield.
Can't waiting till the release of the next mech and hope that you can understand my english.
Niklas
Thanks guys!
Marcel, crest is the word.
Niklas, wow! The similarities are striking. And I never played the game or saw this guy... Don't know whether it's funny or embarrassing. ![]()
The fourth model in the series has four legs, four play features and it's also the fourth smallest mech in the series so far. ![]()
It was inspired by this video game concept art.
4L-22P
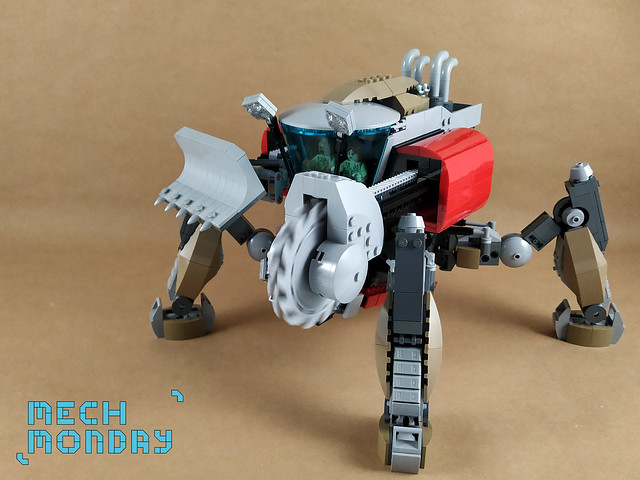
(the picture is a link to a short video with a 360° view and the demonstration of the play features)
Join in on the fun and see what other people have built so far in the Flickr group.
See you next Monday!
I see you're going All In with play functions ![]() ...and i enjoy it. I'm always impressed by stuff like that, while I'm never able to have the patience to include functions (let alone MOC's fourside - viewable). I dig the color-blocking, some clean red parts always work well with grey.
...and i enjoy it. I'm always impressed by stuff like that, while I'm never able to have the patience to include functions (let alone MOC's fourside - viewable). I dig the color-blocking, some clean red parts always work well with grey.
Love to see you experimenting week to week, thumbs up!
Hi Marin,
nice to see another Mech. The play functions are really nice, you could become a Lego Designer. The cockpit and the main part of the body remind me little on a harvester.
Niklas
Marcel, I remember viewing the Giap-Towers from all sides, or am I mistaken?![]() You should try building play features into a model. It's not as hard as you'd think and the satisfaction is worth the extra effort.
You should try building play features into a model. It's not as hard as you'd think and the satisfaction is worth the extra effort.![]()
Niklas, thank you for such a nice compliment. ![]() And you're right, it does look like a harvester. I didn't see it before but I see it now. I clearly remember the process of choosing the windscreen: my sketch originally had an oval bubble canopy; I tried several options but this one (albeit different from the sketch) seemed just right because of the industrial machinery vibe. Now I know where it gets it from.
And you're right, it does look like a harvester. I didn't see it before but I see it now. I clearly remember the process of choosing the windscreen: my sketch originally had an oval bubble canopy; I tried several options but this one (albeit different from the sketch) seemed just right because of the industrial machinery vibe. Now I know where it gets it from.![]()
Hi Marin,
really like the Mechs so far...and the last one with all the paly-features is really great. Also the color scheme works good. I really like it a lot!
Looking foreward to the next mech-mondays.
Cheers,
Ben
This sky soarer is dedicated to Sven, on whom I can always count when I need a brick or two:
50-RR
(the picture is a link to a short video with 360° views of various poses and a play feature)
Join in on the fun and see what other people have built so far in the Flickr group.
See you next Monday!
Haha kind of reminds me of Markus' No.1. That is some massive spear/sword, interesting to get to know more Bionicle parts during your journey. I like it, always searching for cool, old, unknown parts.
The huge wings work well with the Mech scale-wise. To bad, the added color doesn't pop out that much on the picture. Oh, and that massive jetpack is also worth a mention.![]()
Hi Marin,
I like your new mech. The body of this mech is compared to your other mechs less covered, but the shape looks great and you can play very well with this mech. How did you managed to build the red coulour inside the wings? It's my favourite part of this mech. I have to compare every of your mechs with a template and this mech reminds me o this Exo Force set, because of the body which can merge with the booster ![]()
Du hast noch kein Benutzerkonto auf unserer Seite? Registriere dich kostenlos und nimm an unserer Community teil!